

Night photography may seem like it’s complicated but that’s not the case, just a few principles are needed, some trial and error and a little patience. It’s extremely rewarding after putting in some effort and time to see what’s possible when you get it right.
-
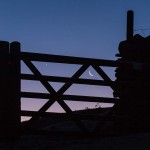
- Working fast as the sun rose I had to make tiny adjustments to my tripod position until I lined up the moon perfectly inside the gate triangle. Canon 5D MkII, 70-300mm at 108mm, ISO 100, 1.6 sec at f/25, tripod. © Stuart Holmes 2014
Stars or star trails
When photographing the moon, stars and constellations your choices are taking a short exposure of typically less than a minute to capture the sky, Milky Way or meteors or take a long exposure of many minutes or hours to capture star trails.
Stars, Milky Way and meteors – short exposure
As the earth rotates, the stars appear to move across our skies. You can’t see the stars moving but it’s significant enough to streak the stars in a timed exposure. To avoid stars moving in our images we can use what is called the 600 Rule to calculate the length of an exposure.
By dividing 600 by the 35mm focal length equivalent of the lens we arrive at the maximum number of seconds for our exposure. For example using a 28mm on a full frame camera would allow 600 / 28 = 21 seconds of exposure time without apparent star streaks. With a 1.6 crop factor camera the time would be 600 / (28 x 1.6) = 13 seconds. The longer the focal length, the shorter time you have.
After calculating the time the only variables to play with for a correct exposure are the aperture and ISO. By using the maximum aperture (smallest f/ number) you can use the lowest possible ISO to minimise high ISO noise.
-
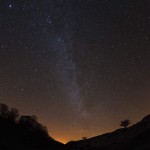
- The Thirlmere Valley is the best place I have found locally to avoid too much light pollution. The lights of Keswick still give a yellow glow on the horizon. A bright Geminid meteor is caught during this 40 second exposure. Canon 5D MkII, 15mm Fisheye corrected, ISO 1600, 40 sec at f/2.8, tripod. © Stuart Holmes 2014
Star trails
A long night time exposure will result in stars tracking across the sky. The length of trail will depend on the focal length of the lens used, the exposure time and importantly where you are looking in the sky. In the northern hemisphere Polaris, the North Star, is the star around which all stars rotate. Moving south from Polaris the more apparent movement you will record in your frame to a maximum over the equator.
Exposures longer than 30 minutes are best. Calculating the aperture requires a bit of trial and error and depends on how long an exposure you want and how much ambient or moonlight is present. A good starting point for a 30 minute exposure on ISO 100 is f/6.3. It’s actually hard to over-expose on a dark night.
-
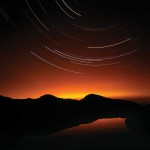
- A 2 hour exposure looking north from below Scafell Pike in the Lake District. At the centre of the rotation is Polaris, the North Star. The yellow and orange glow is light pollution from Carlisle and was barely evident to the eye, the long exposure has emphasised it. Mamiya 7II medium format camera using Fuji Velvia 50ASA film, tripod. © Stuart Holmes 2014
Shooting the moon and by moonlight
The best time to photograph the moon is when it is low on the horizon. Just after sunset or before sunrise is good when there is colour in the sky. As the moon rises any haze or pollution in the atmosphere can add a beautiful colour tint to the moon.
To get a decent size moon in your frame you will need to use a long lens, preferably 200mm or longer. This is good for capturing the moon against a silhouetted skyline, tree or mountain.
To get the correct exposure to capture detail on the lunar surface, meter directly off the moon itself, it is surprisingly bright. As a starter for a full moon try ISO 100, f/11 and 1/125. The moon moves approximately its own diameter every 2 minutes. This means you need to use a relatively fast shutter speed to avoid blurring.
Photograph the moon as a crescent or when it’s partially full to best capture side-lit craters and mountains.
The amount the landscape is illuminated by the moon depends on it’s phase and position. The moon can be bright enough to cast shadows and even, if there is mist or fog, create moonbows.
-
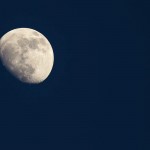
- A beautiful 3/4 moon. look closely at the shadow side on the left and at the bottom, the low angle of the sun casts shadows emphasising the craters. Canon 60D with 400mm lens, ISO 100, 1/250 sec at f/11. © Stuart Holmes 2014
Camera considerations
Most cameras will have settings that allow exposures of up to 30 seconds. This is adequate for some night shots but for star trails especially you will need to use a B (Bulb) setting with a cable release to enable exposures of minutes or hours.
Full frame cameras do best here, normally the larger the sensor the better the low light capability.
-
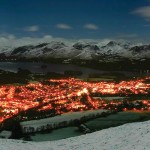
- From Latrigg the lights of Keswick resemble lava in a volcano. Stitched panorama of 4 x 25 second exposures. There was a full moon and snow on the ground making the whole scene relatively bright. Canon Rebel with 17-85mm at 24mm, ISO 100, 4 x 25 secs at f/5, tripod. © Stuart Holmes 2014
Some tips for night photography
- Find the darkest skies possible and try to avoid light pollution from towns. Don’t forget your torch.
- Ensure batteries are fully charged.
- Use a good tripod weighted down if it’s windy.
- Use a remote shutter release or self timer and mirror lockup (SLRs only) to reduce camera shake.
- Autofocus on a bright object like the moon before exposure then turn autofocus and image stabiliser off to avoid blurred shots.
- Frame your shot using the highest ISO as a test shot before dropping the ISO to the lowest usable setting.
- Exposure times can vary from a few seconds to many hours depending on the subject.
- Long exposure noise reduction or dark frame extraction. This is a function in most DSLRs and works by taking a second exposure of exactly the same length as the first with a black screen. Any noise appearing on the dark, second, exposure is subtracted from the first. Rather than wait a long time before you can take the next shot, turn off noise reduction and fix later using software.
- Some cameras have a virtual horizon to level the camera.
- Shoot RAW – easier to correct white balance and exposure if you need to make a shot lighter or darker.
- Use the histogram to check exposures, at night the rear preview screen may show a bright photo in the dark when it’s actually underexposed.
- Use the widest and fastest lens for capturing stars and sky without star movement.
- Know your camera controls, using a torch will spoil your night vision.
- Turn off all displays and anything that may reduce battery life.
- Dress warmer than you would expect, you will spend a lot of time hanging around. A flask with hot drink is very welcome on a cold night.
-
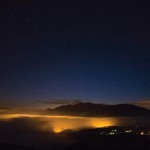
- From Walla Crag the lights of Keswick illuminate the inversion cloud. Can you make out the Plough (aka Ursa Major or Great Bear) above Skiddaw? Canon 5D, 12-24mm at 12mm, ISO 400, 25 secs at f/5, tripod. © Stuart Holmes 2014
-
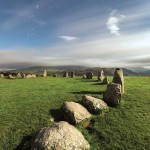
- On this very bright full moon-lit night it was possible to walk around without a torch. The moon was casting shadows. The photo above looks like a day time shot apart from there are stars in the sky. Canon 5D MkIII, 14mm, ISO 1000, 78 secs at f/5.6, tripod. © Stuart Holmes 2014